Taking a Reservation |
Top Previous Next |
The simplest reservation must have a First Night, Last Night, and a customer's Last Name. Typically you would also assign a site to the reservation as well, but this can be done later if you prefer more flexible reservations.
Let's say that Mr. Able calls to say he will be arriving tomorrow, staying for 2 days, and would like a full-hookup RV site (with a sewer hookup). You know that Mr. Able has been here before and don't need any guarantee, so you just want to make sure a spot is saved for him.
1) Start by clicking the Telephone icon (the first one in the toolbar):
![]()
The New Reservation Entry dialog should appear:
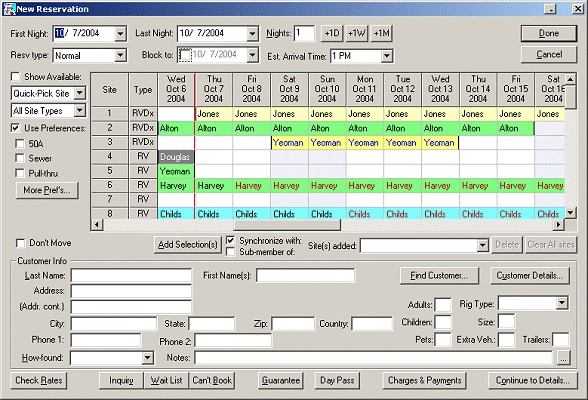
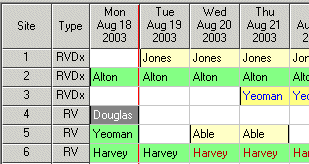
By the way, notice the red vertical line in the grid -- that's the divider line between yesterday and today. By default, the Rack view shows yesterday in the first column so you can see who might still be on site in the morning (and who hasn't checked out yet). This helps you avoid placing people in those sites until you're sure the current occupant has left.
2) Now select the first night to be tomorrow. That can be done by typing the date (tip: use the '/' key to jump to the days portion of the date), but you can also select the date by dropping down the calendar (click on the down-arrow button next to the date):
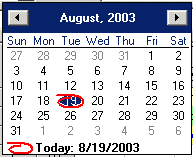
Now just click on tomorrow's date -- the 20th in this example. Note that today is circled in red on the calendar for reference.
3) Since he's staying 2 days, the easiest way to enter that is to click the +1D button (next to the Nights field). You could also enter the number of nights or the Last Night directly, but the buttons are convenient if you're already holding the mouse.
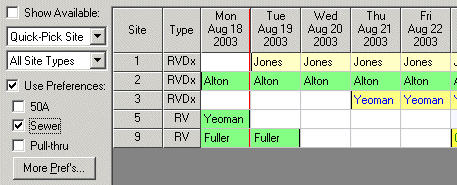
4) To make sure you select a full-hookup site, you can check the Sewer box under Use Preferences. The sites shown will now be limited to the ones that have the selected attributes:
By the way, the preferences shown are very flexible -- up to 5 "quick-check" preferences of your choice can be configured to appear here, and many more can be accessed through the More Prefs button. Naming the preferences and configuring the sites accordingly is completely under your control.
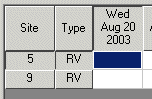
5) Lets also check the Show Available box so that we only see sites that are available for the days we selected:
OK, now we're getting it narrowed down! Notice also that when Show Available is checked, the first date shown in the grid changes to the first night we selected.
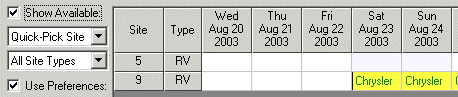
6) Site 9 would work, but we know that Mr. Able tends to stay longer than he plans. So lets select site 5 since it's wide open.
There are 3 different ways to select a site to be used. You can use the Quick-Pick Site list, or you can click on the site in the grid and then click the Add Selection(s) button, or you can take the shortcut -- just double-click on the site in grid (on the white cell for the date you want). For instance, double-click on the cell shown in blue below (it's not blue for you yet, but it will turn blue momentarily when you click on it):
Once it's selected, you will see <new> appear in each cell for the reservation we're making:
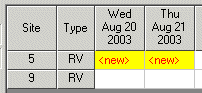
If you don't see this and just see the blue box as in the first image, it may be that the double-clicking didn't take. Look at the Site(s) Added field below the grid to make sure the site is there. If not, make sure the site is highlighted as above and click the Add Selection(s) button.
![]()
7) Now we just need to enter the customer information. Whenever you enter a customer's last name (or part of one) for a new reservation, Campground Master will check to see if it has anything matching that in the customer database. So, first click in the Last Name field (or you can press Alt-L to jump to it), then enter the letter A and press Tab. The Customer Selection dialog will appear, showing any matches (in this case, any that start with "A").
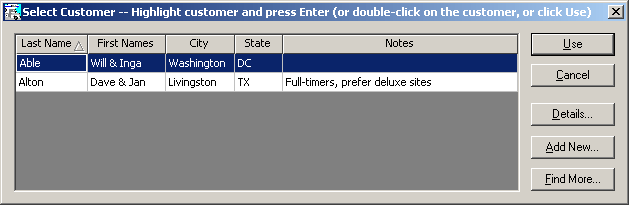
8) Now just double-click on the name Able (or, since this is the first name showing and it's already highlighted, you can just press Enter to use that one). The dialog should go away and Mr. Able's information should now be in the New Reservation Entry dialog.
The Customer Info portion of the dialog should now look like this:
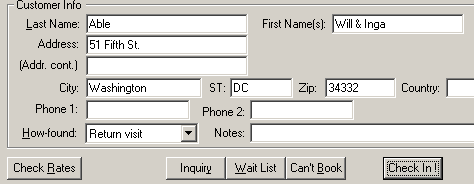
Note that How-found has been automatically set to "Return visit", since they were a previous customer.
If you would like to let them know the rate and total cost of their stay, you can click the Check Rates button (or press Alt-R). That will show a rates selection dialog, where you can select the appropriate rate(s) and have it calculate the total.
9) Now click the Done button in the upper right corner of the dialog to finish the reservation. (Note that if they were a walk-in customer and ready to check in, you could click the Check In! button instead to immediately check them in.)
Deposits -- Alternatively, you may want to take a Deposit for the stay -- see the steps in the later section "Guarantees and Advance Deposits".
Mr. Able should now appear as a pending reservation on the Rack, shown in a light yellow color, like this:
That's it! You have made a reservation!
Next step -- Using the Map View