Starting Walk-in Reservations from the Rack |
Top Previous Next |
Earlier in Taking a Reservation, we started a reservation with the telephone icon. That's just one of several ways to start a reservation. You can also start by locating a suitable site on the Rack view first, so you have a much larger overview to work with. You can also narrow site selection down by sites available and by type, just like on the New Reservation dialog (only the Preferences selections aren't available on the Rack). While either way works well for walk-in reservations, we'll start with the Rack for this example.
OK, so lets say we need a Tent site for 3 days.
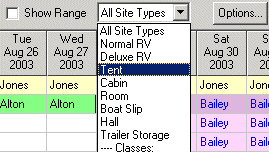
1) If your park has more than a few sites, the tent sites may not be immediately visible on the Rack. They may not even be all listed one after another, depending on how you've arranged the sites. So first limit the visible sites to tent sites by selecting Tents from the site types list:

Now only the tents are listed:
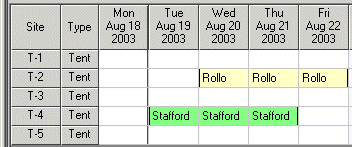
2) It's pretty obvious here which sites are available for 3 days, but for the sake of example lets assume there were many tent sites and most are occupied. We can further limit the selections by entering the dates and selecting Available only.
First select the To date by clicking on the down-arrow button next to the date. A calendar will appear, so you can select the date without typing.
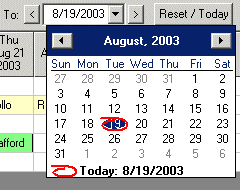
3) Remember that the "To" dates for reservations are based on the "Last Night". So for 3 nights, click on the appropriate date (in this case, the 21st). The calendar will close and the new "To" date will be shown.
4) Now check Available Only to remove any sites that can't accommodate the requested dates.
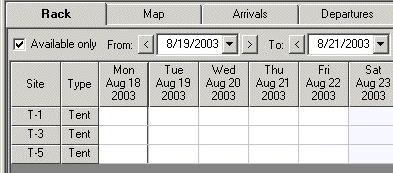
5) OK, now you can see exactly what's available. Just double-click on today's cell for site T-1 (this is highlighted in blue below, but it won't be highlighted on your screen).
Remember that the red line is the "today" mark, so today is always the column to the right of it.
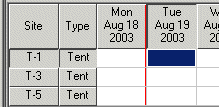
If you have difficulty double-clicking, you can right-click on it and select "New Reservation" to do the same thing.
Either way, the New Reservation dialog will be displayed. Since we already selected the site and dates on the rack, those are already filled in for us.
6) Now we need to enter the customer information. Lets say this customer is not yet in our database. Go ahead and enter a name in the Last Name field (lets use "Thomas") and press Enter. There are no "Thomas"es in our database yet, so you will see the message "No matching customers were found". If there had been others they would be listed. Since this is a new customer, we can now just press the Enter key to select the default action, which is Add New.
7) The Customer Details dialog will be displayed, where you can enter as much information as you like for this customer. When that's done, Click Save to save that customer in the database. You will then be taken back to the New Reservation dialog, and the customer information you entered will be shown.
8) The How-found field will be highlighted, so you can select an appropriate item if you like.

9) OK, we're almost done.... click the Check In button to check him in, since he's here now. After a confirmation prompt, the Transactions dialog will be shown. Since auto-rates are enabled, the charges are already added:

(The charges you see may differ if weekend days are included in the reservation dates.)
Now just enter the payment and print a receipt, as covered earlier in Checking In and Adding Charges.
10) After that's all done, you'll want to get the Rack back to normal. To do that, click the "Reset/Today" button:
![]()
Now the full Rack is back and you're ready for the next one!
Next step -- Guarantees and Advance Deposits